
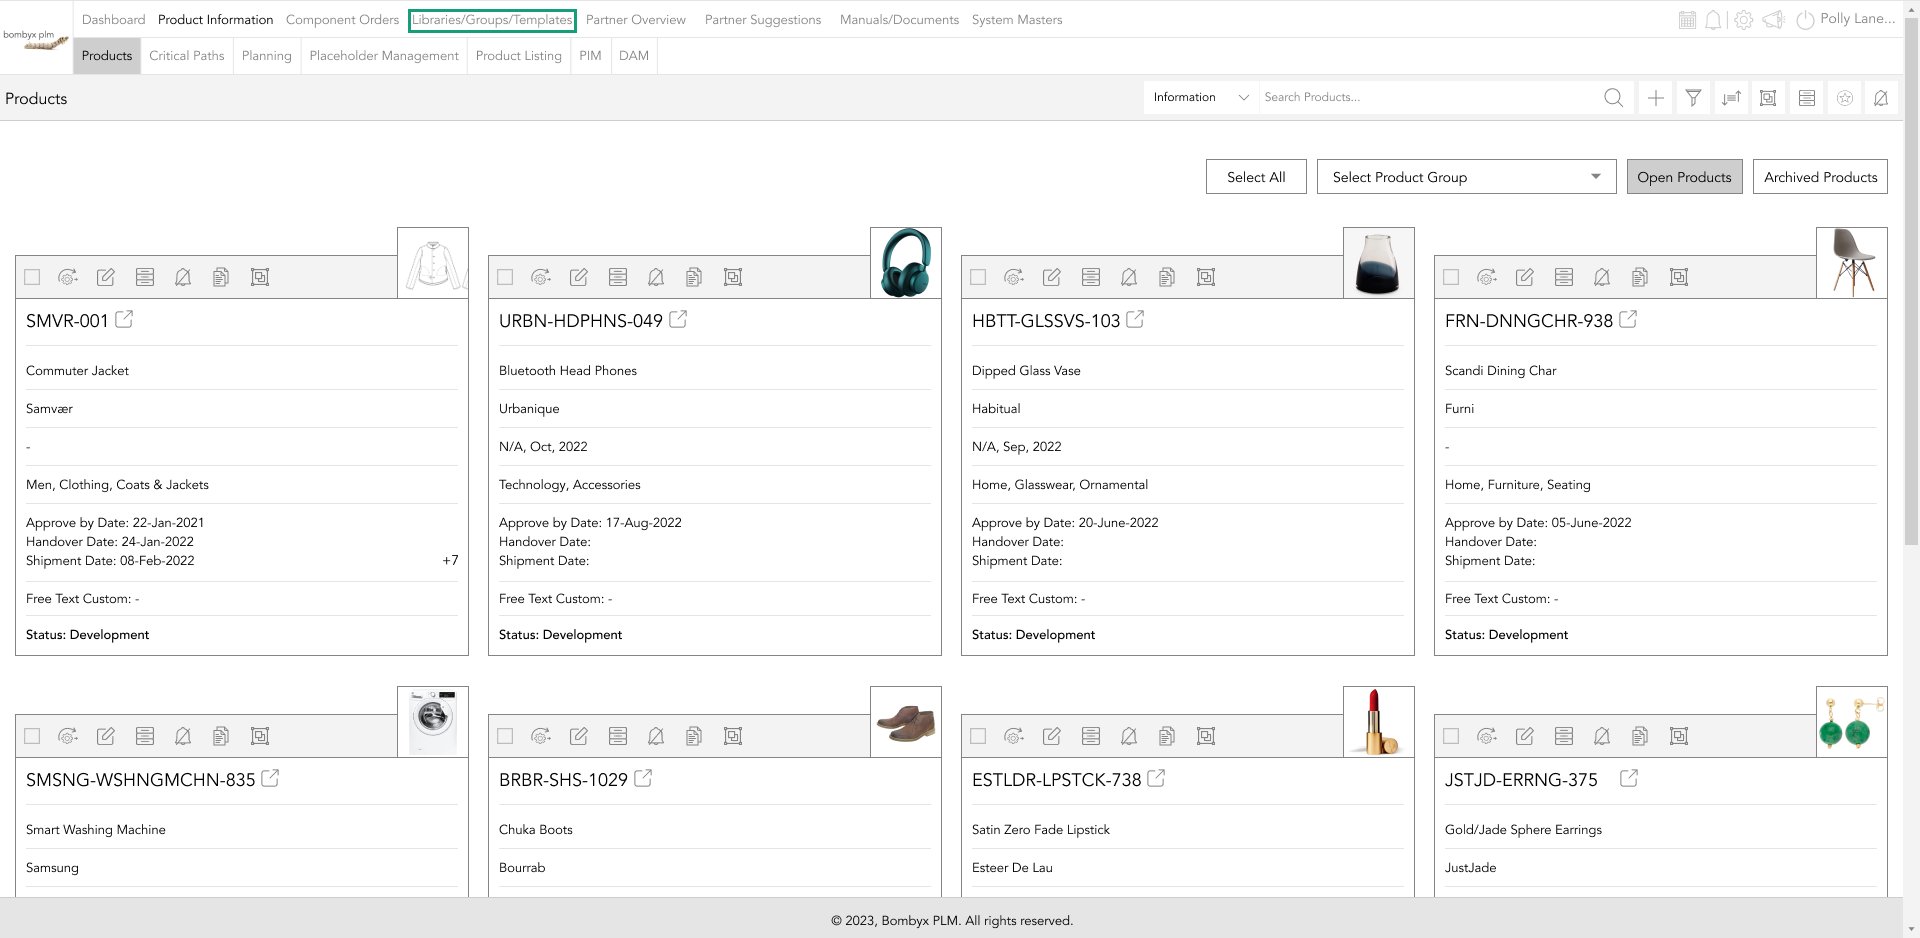
navigating to the gradings
To be able to access the ability to see poms and gradings, you will need to click on the libraries, groups, and templates which can be found in the top bar.
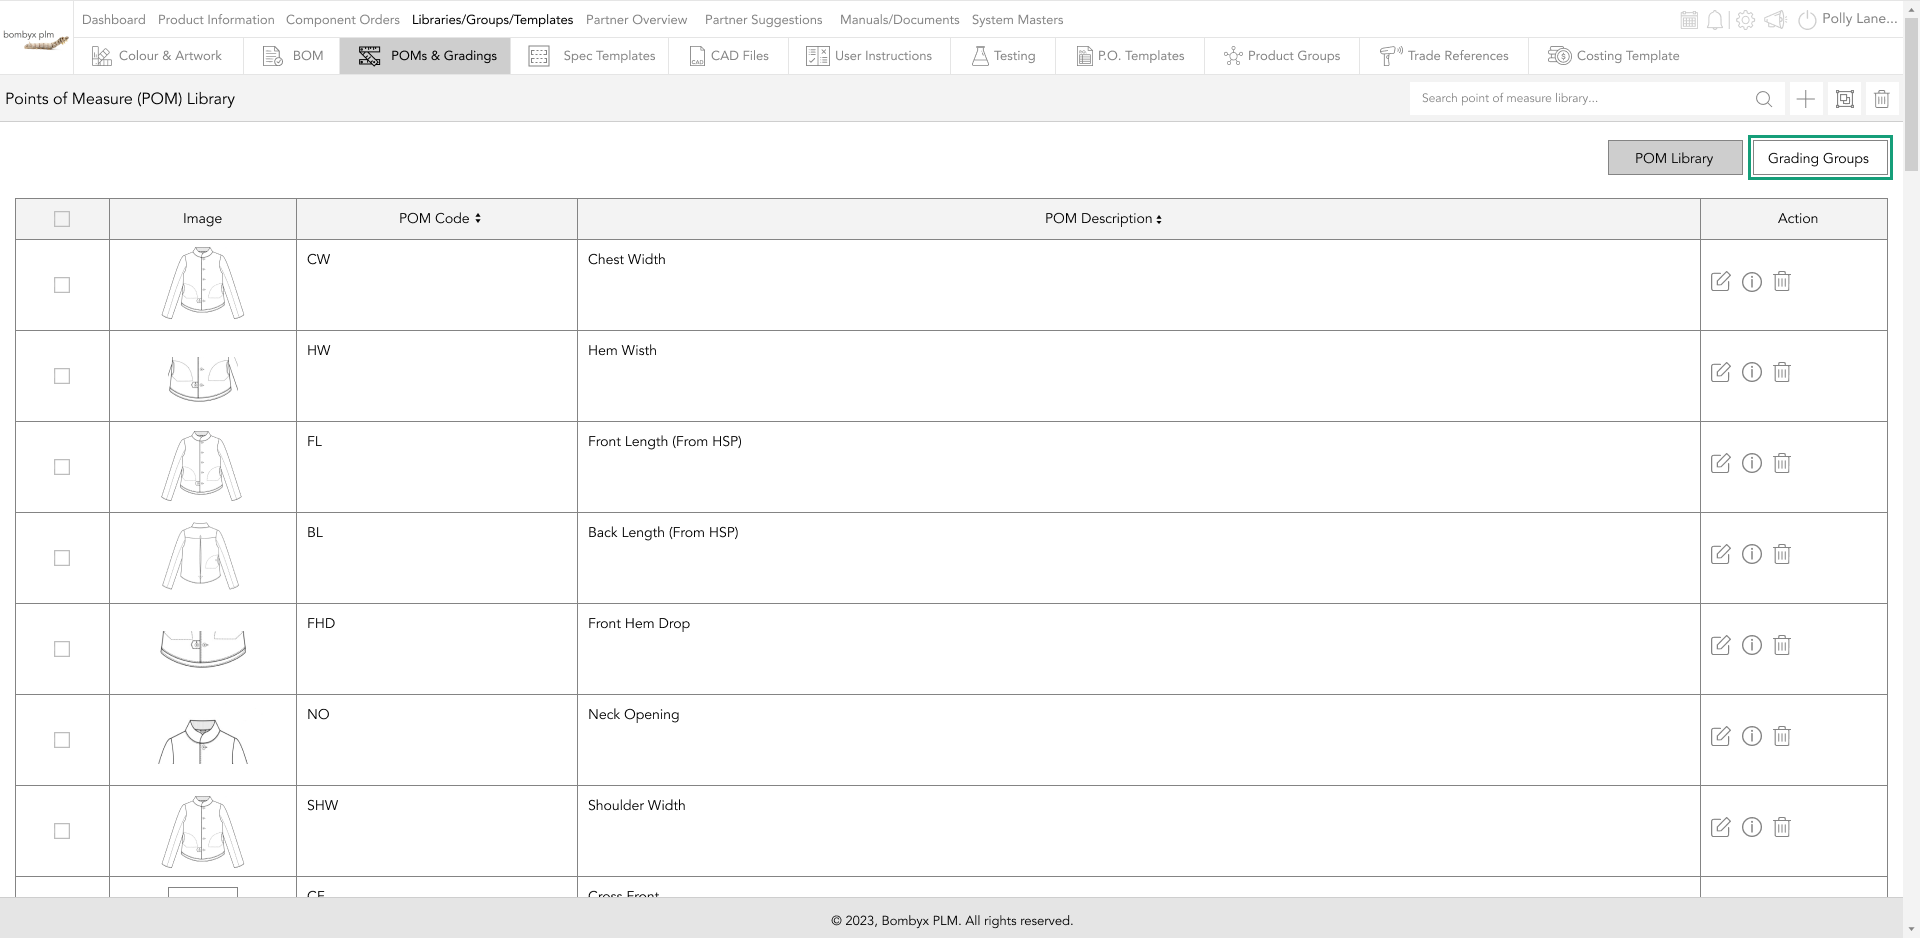
Once tapped look across the middle bar and see POM & gradings tab, you will need to tap this to access the pom library and the grading groups.
Once in the pom library, navigate to the grading group button on the right-hand side of the page.
creating a new grading group
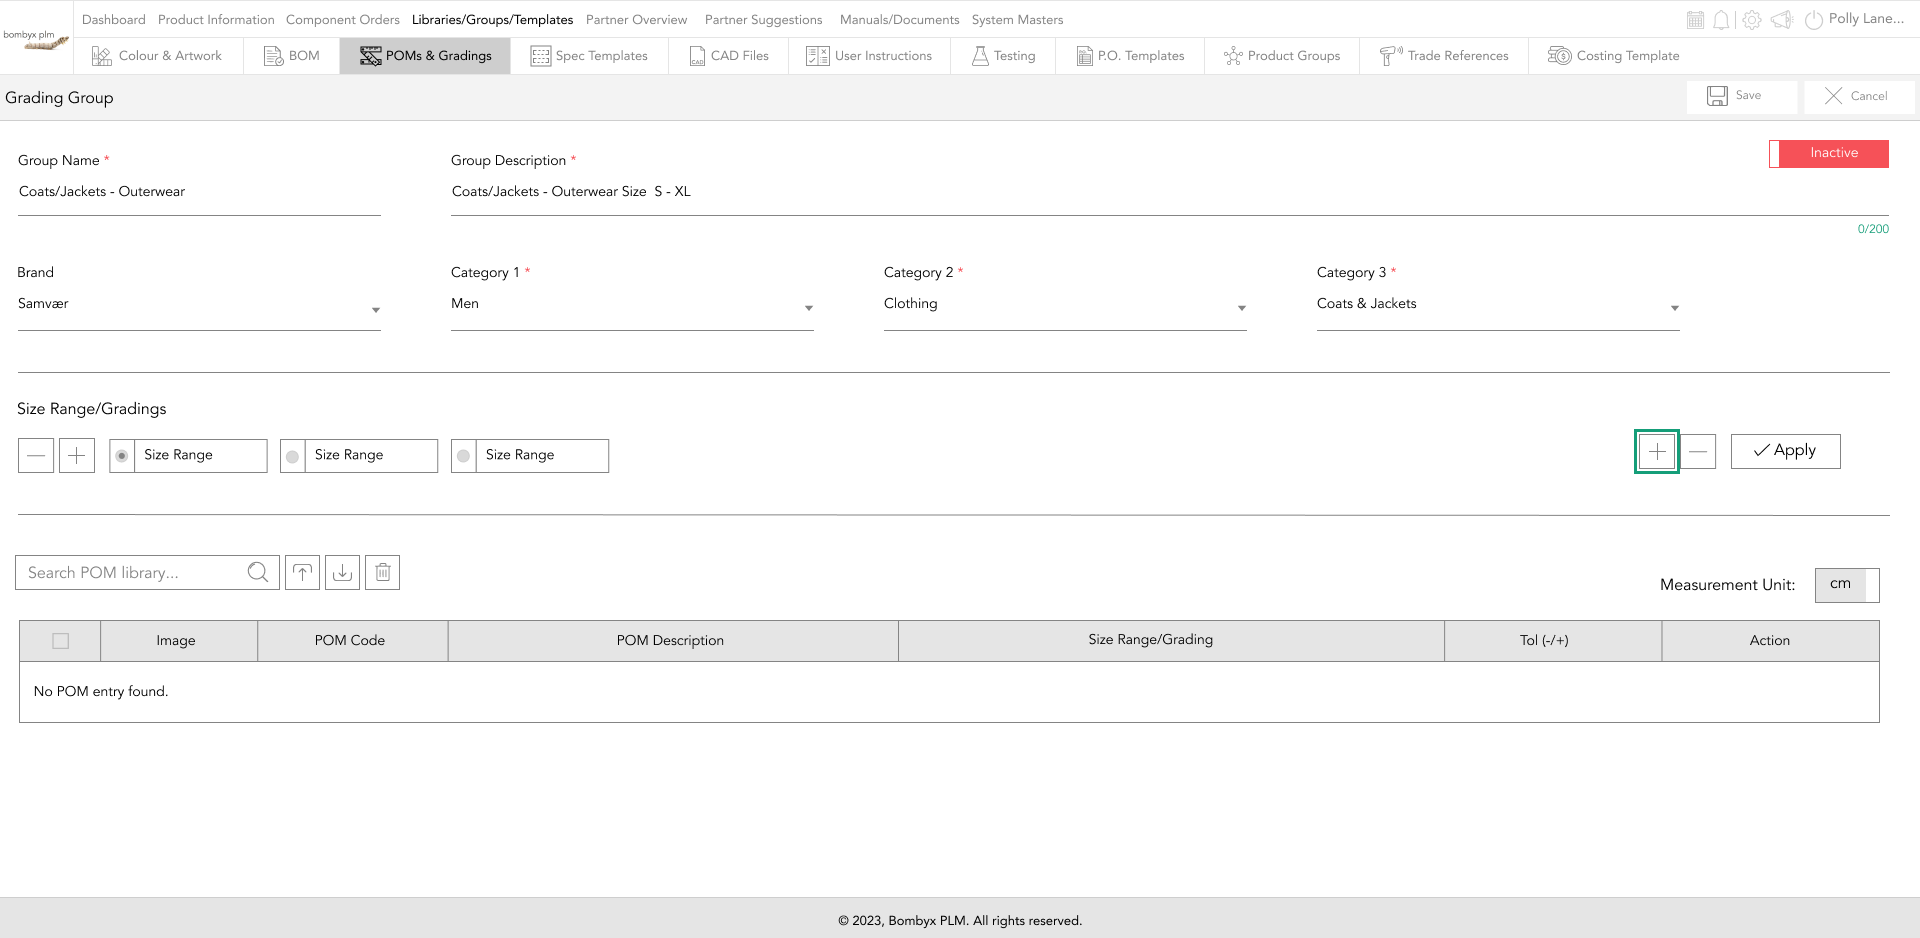
To create a new grading group you will need to click on the plus icon, this will then take you to the group's creation page.
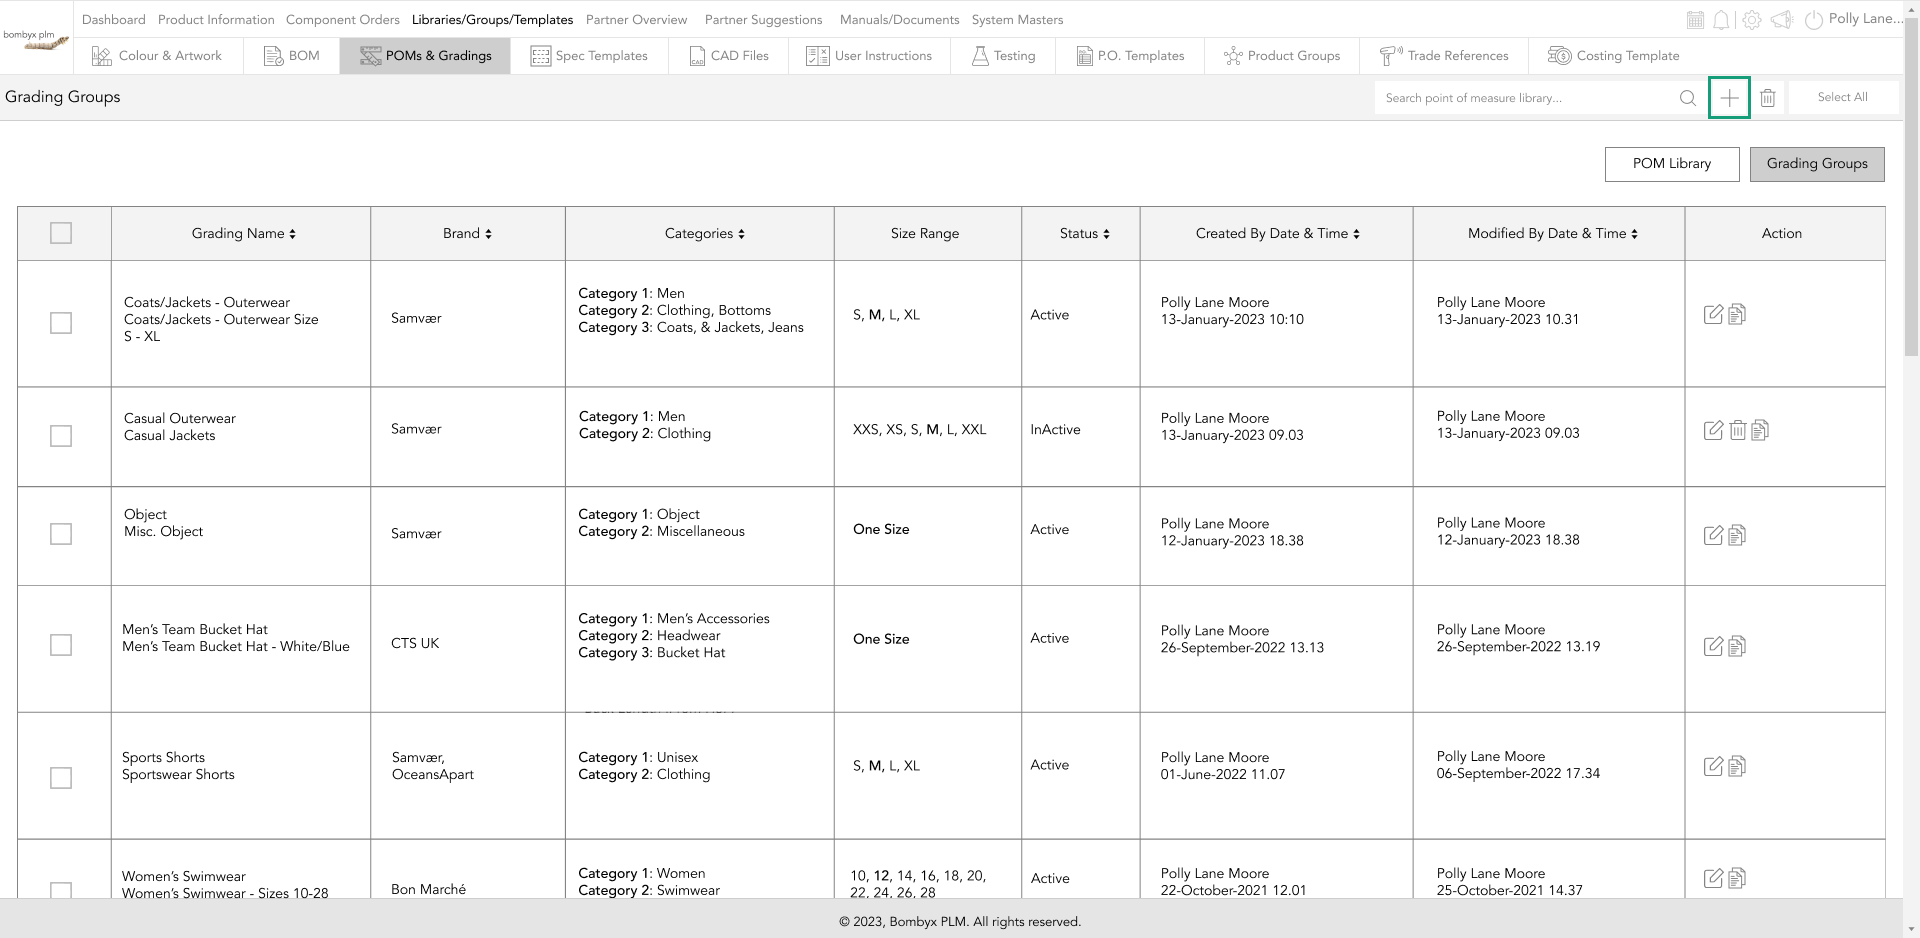
Here you will see 5 mandatory fields that you will need to fill in, before allowing you to save the grading group. So just enter or select from the dropdowns.
Once done you can now save your group, if you do not have the other information to hand, you can enter it at a later date.

Note: In the group, you need to make sure the categories that are selected from the dropdown are matching/line up with the ones that have been allocated to the products, otherwise, you will be unable to assign the grading group to them.
size range/grading
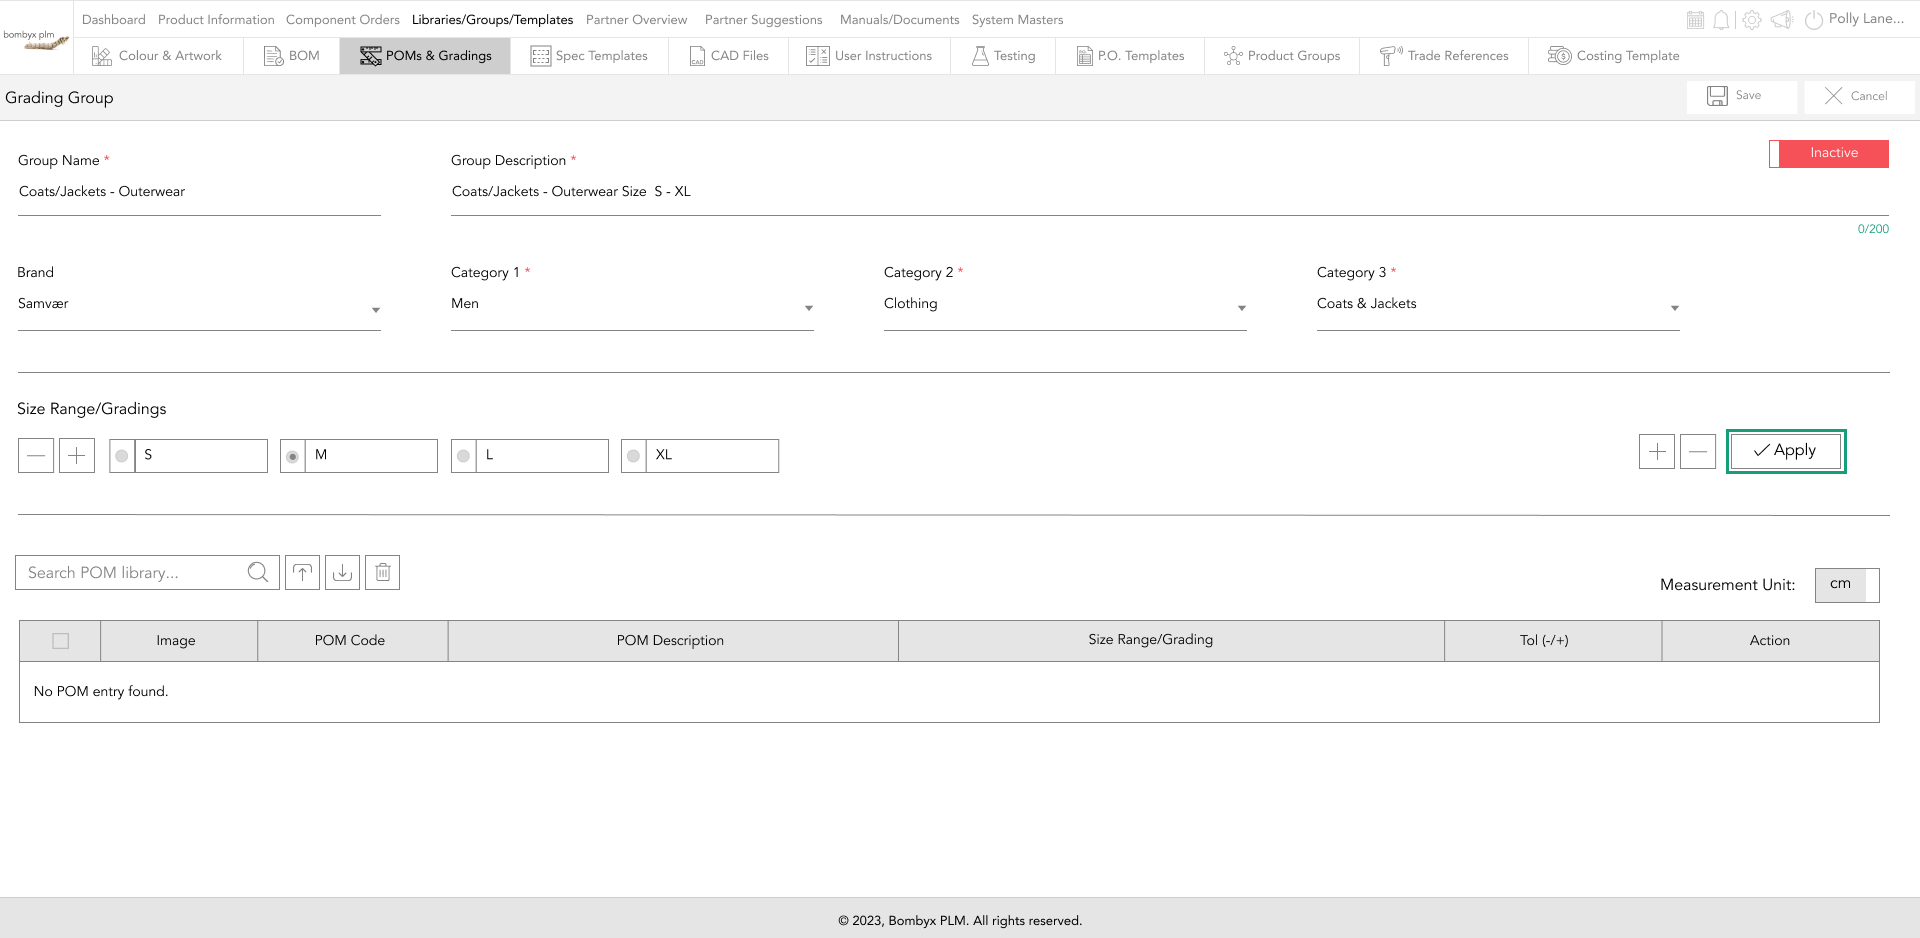
Size/range grading is where you would include what sizes the product is, and the plus and minus icons you can use to add or remove to get the correct amount you need.
To add more size range/ grading tap the plus icon.
When you have the correct number of cells for the sizes, you can now enter them, selecting which will be your sample size, by tapping the circle icon, then tapping the apply button to save your size range gradings.
measurement unit
Although your measurement unit will be set to cm or inches by your company administrator, there may be times when you want to convert these measurements. All you have to do is tap the sliding button and it will take you from centimeters to inches.

When inches are selected, you have a further option to view your inches in decimals or fractions. Tap the sliding button, and it will change the view of your measurements to the selected view.
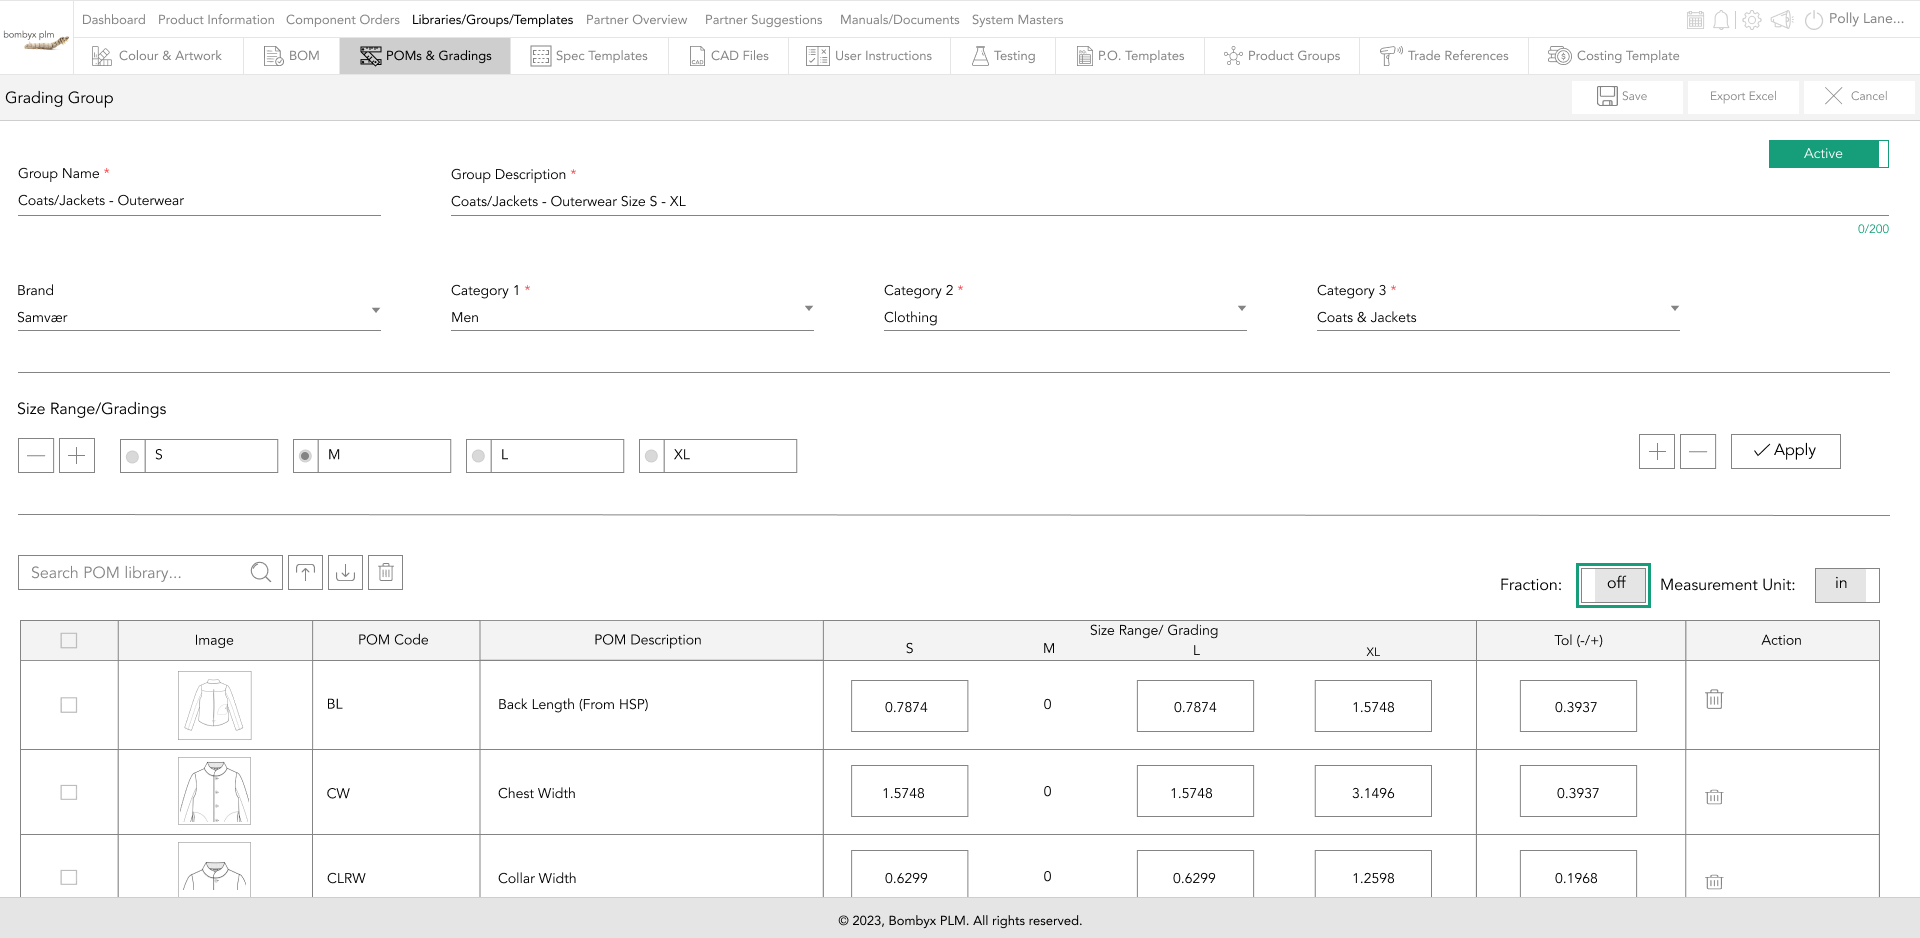
adding poms in a grading group
To add poms to the grading group, one way you can do this is by using the search bar function, start by typing in the pom code or description in the search bar, and Bombyx will filter through the libraries.
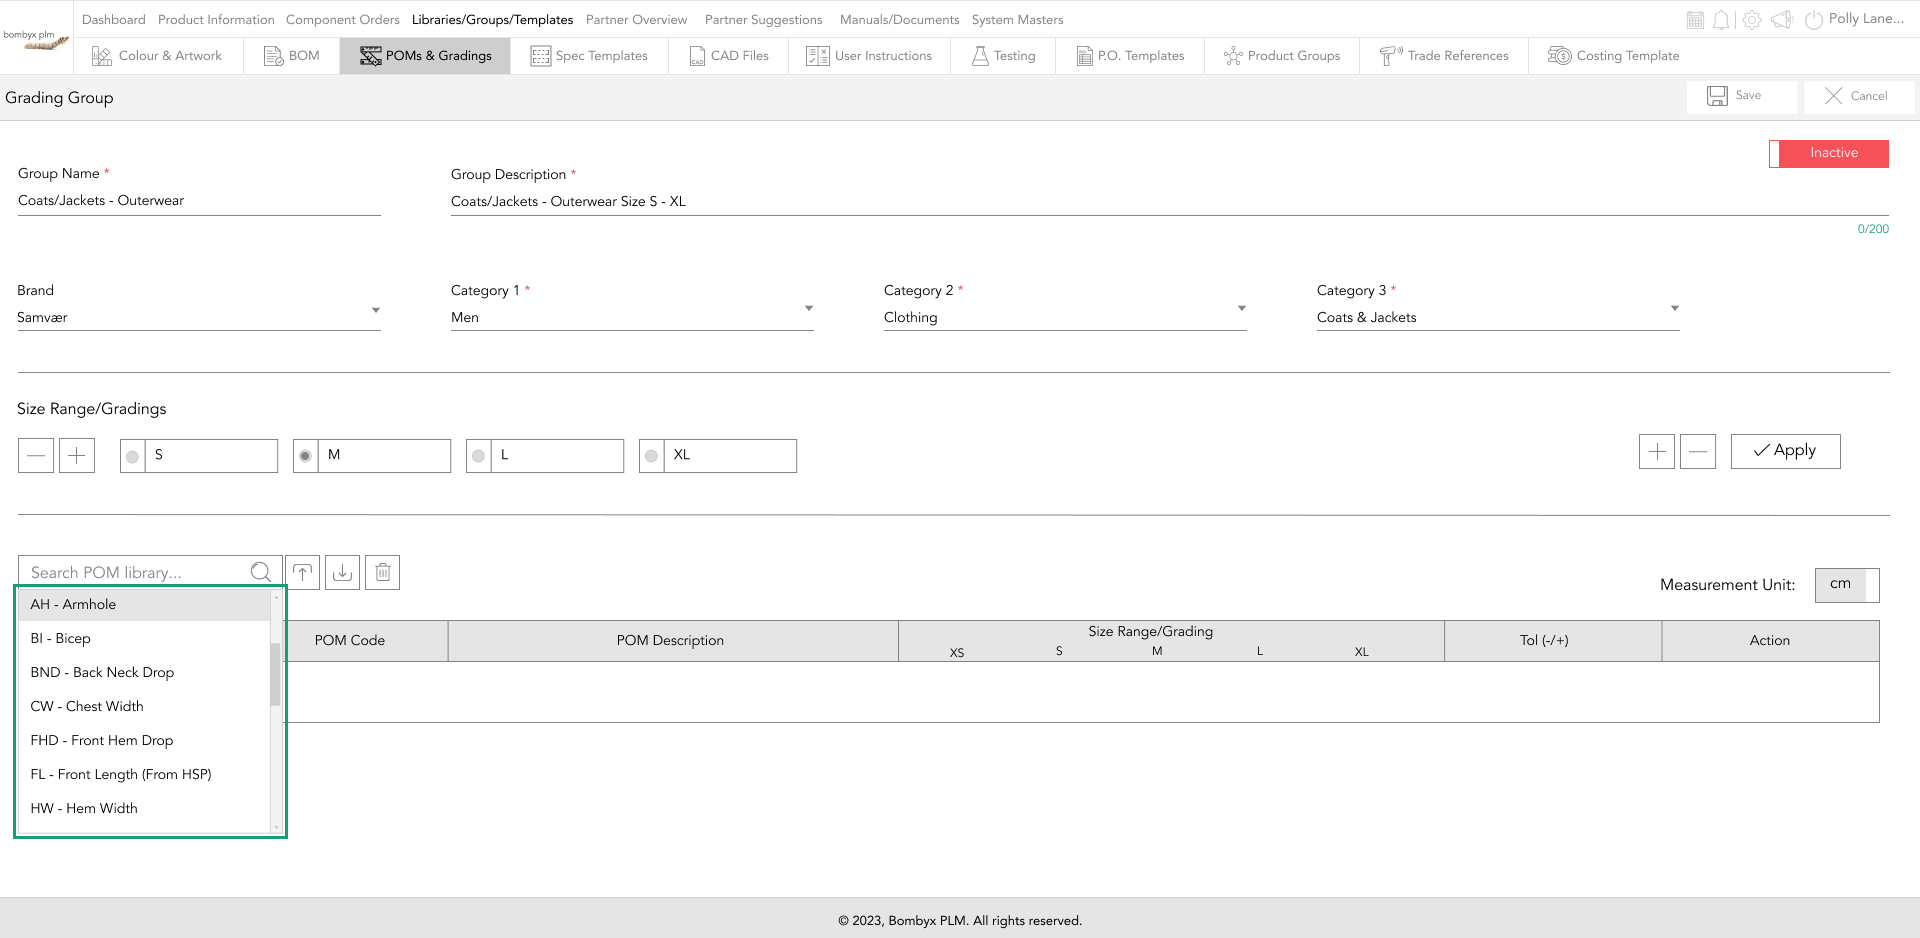
Once you see the pom, tap to import it.
Another way of adding poms to the group is from the pom library. If you want to find out how to add poms to a group from the library then head over to the pom library tutorial to find out more.
editing grading groups
To edit or update information in the grading group, tapping the edit icon on the group's row, will enable you to edit/update the grading information you have previously entered.

Note: Any poms that are edited in the group will be changed here only. If this group is allocated to products already, then any changes in that group will not be changed in the products it is already assigned to.
duplicating grading groups
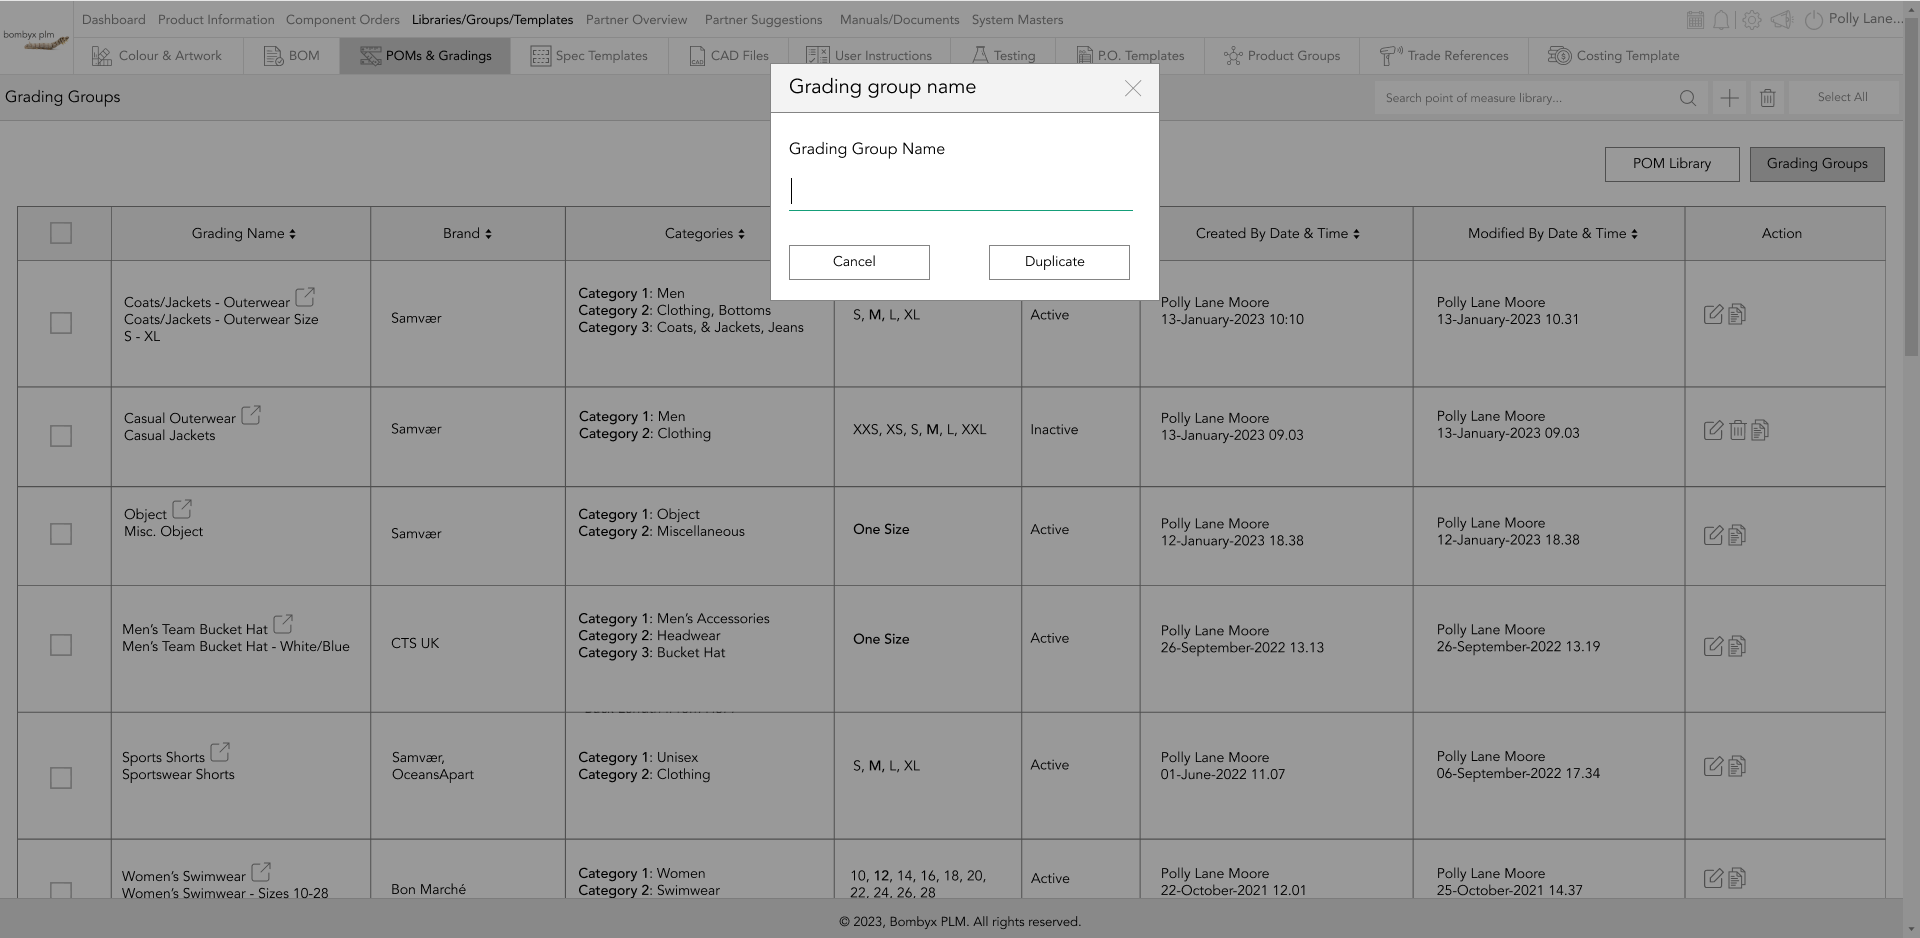
To duplicate an already existing grading group, you can do this by tapping the duplicate icon at the end of the row of the selected grading group you want to duplicate.
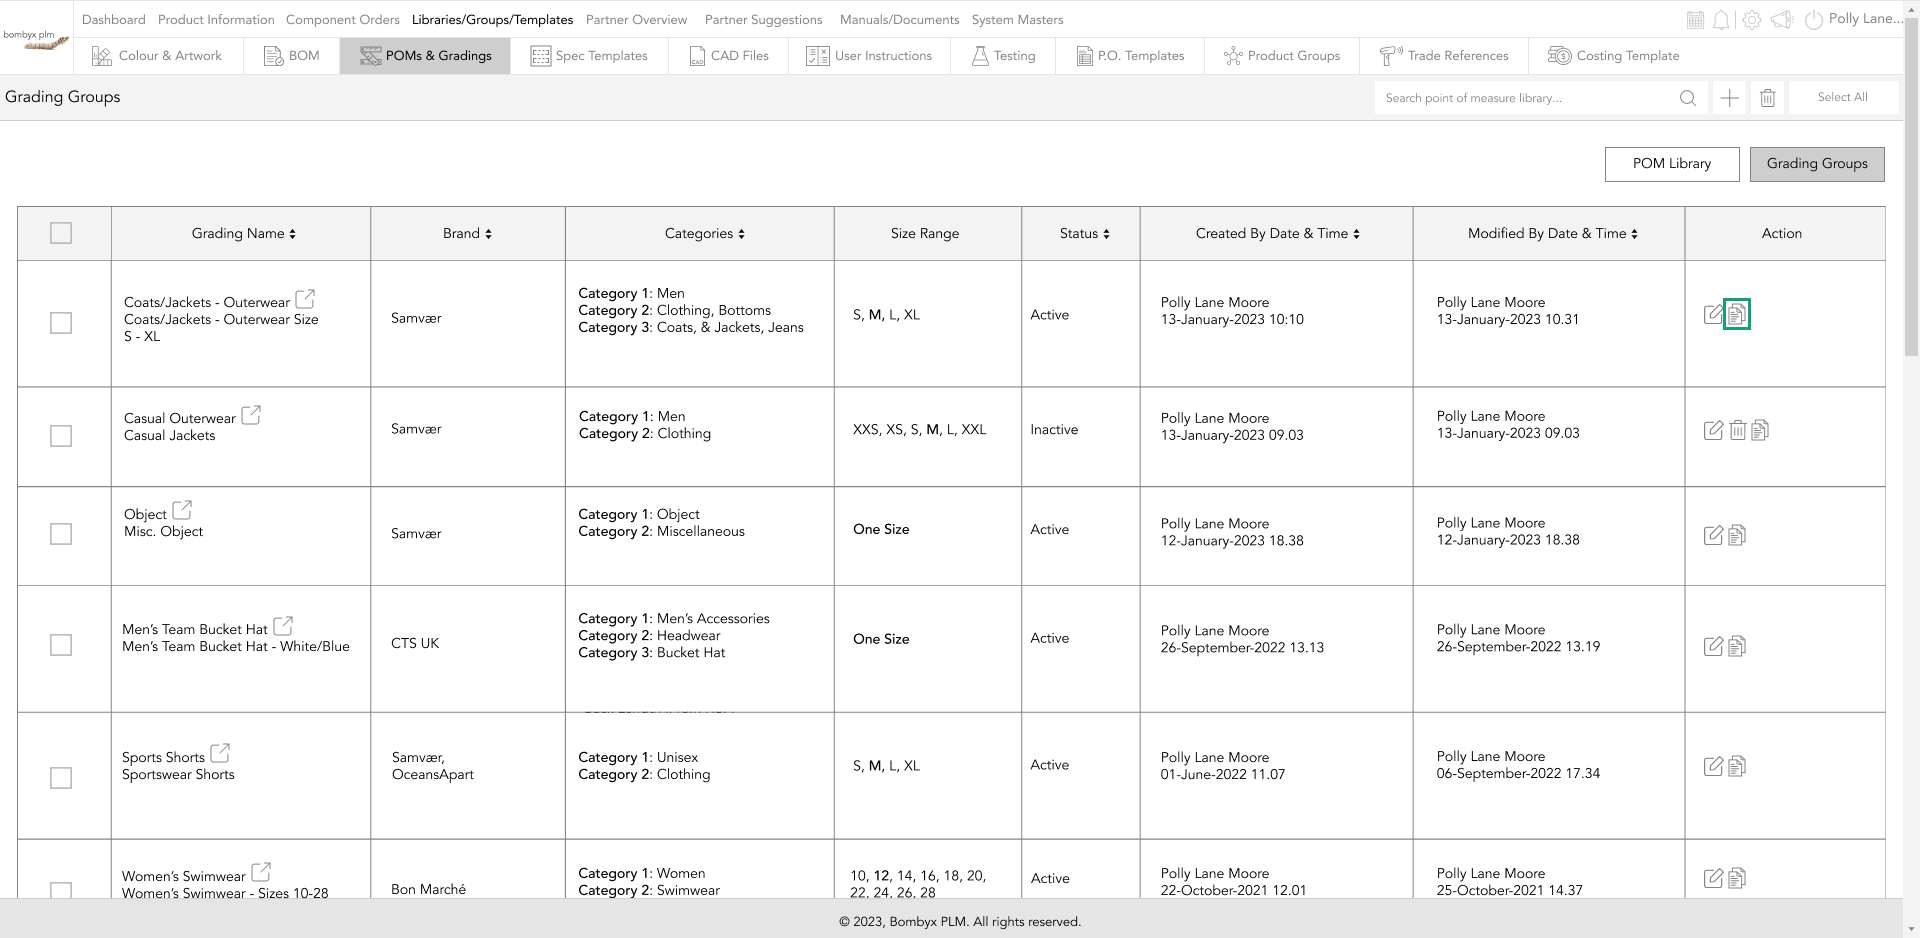
Once tapped you will need to enter a name for the grading group, as each grading name needs to be unique in the system in order for it to save.
deleting single and multiple grading groups
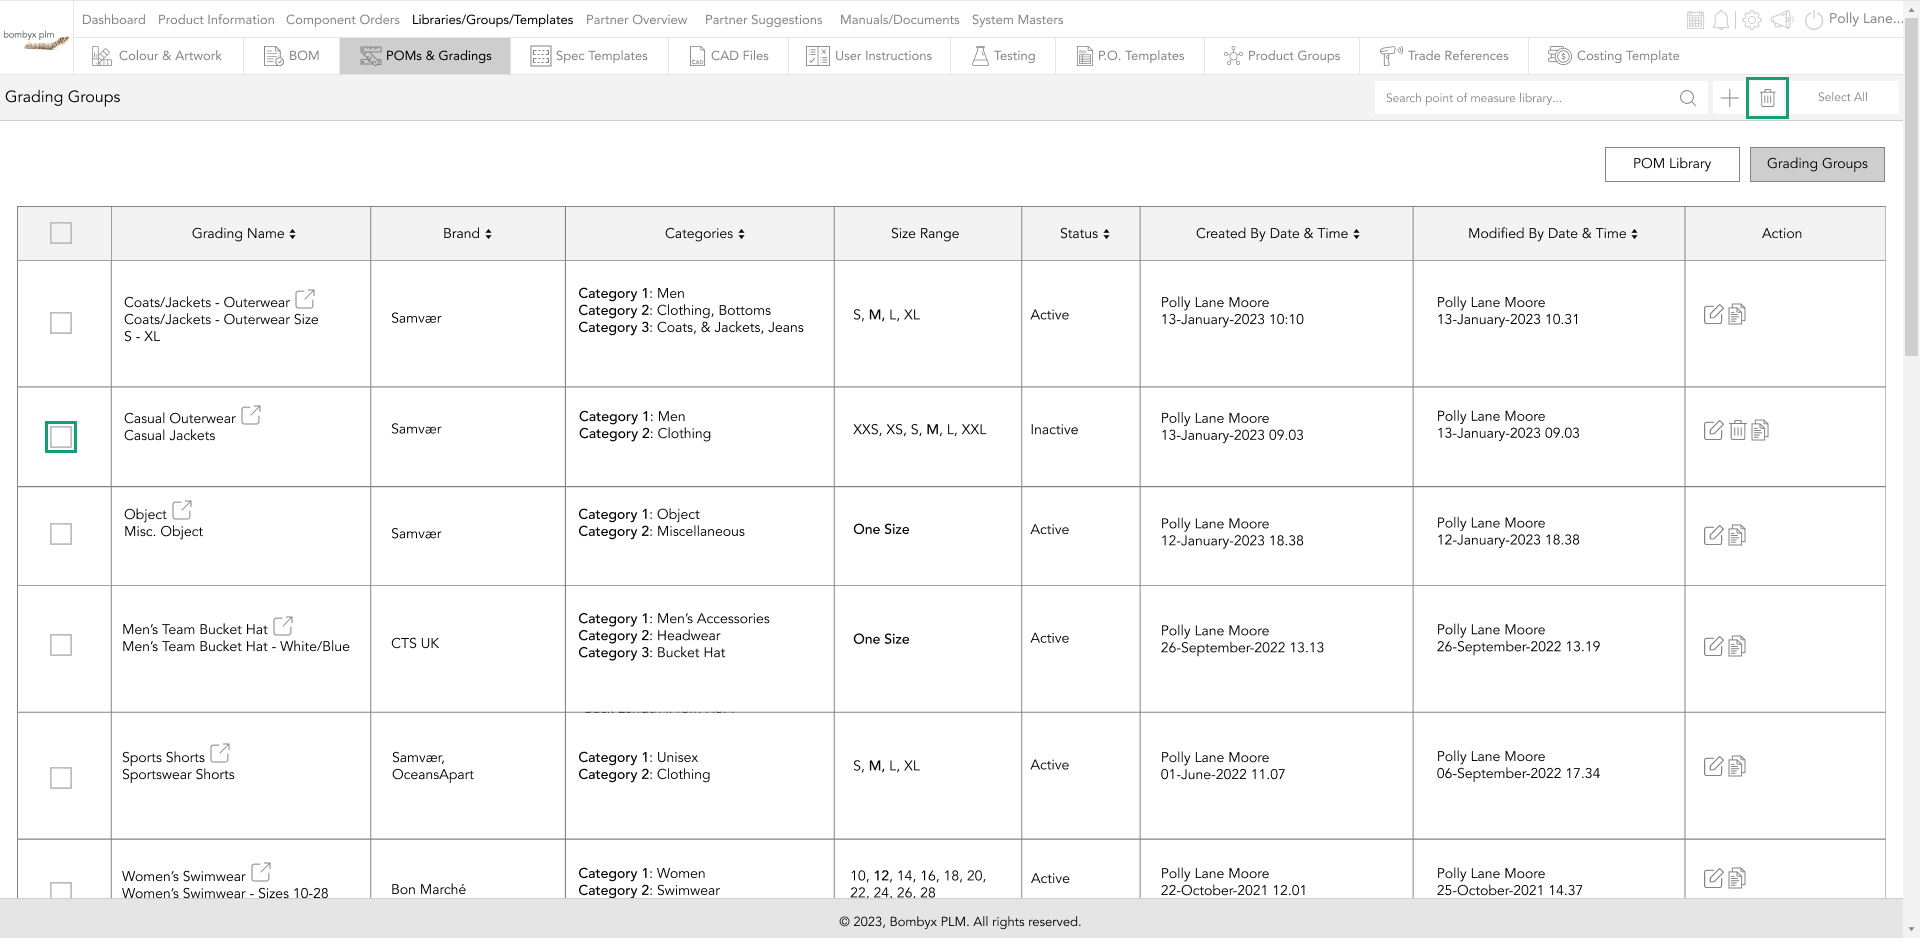
There are two ways of deleting groups, single delete or multiple at once. If your grading group is still assigned or being used in a product, then you are going to be unable to delete this.
To delete a single grading group that is no longer been used on the system, tap the delete icon that is under the action column at the end of the row of the selected group.

To delete multiple groups, tap the checkboxes on the left side of the row, then tap the bin icon that is positioned on the right-hand side of the page.
exporting excel sheets
If for whatever reason you need to export your product's specifications and/or its gradings, tap export excels and this will download an excel document with the information shown on the system.
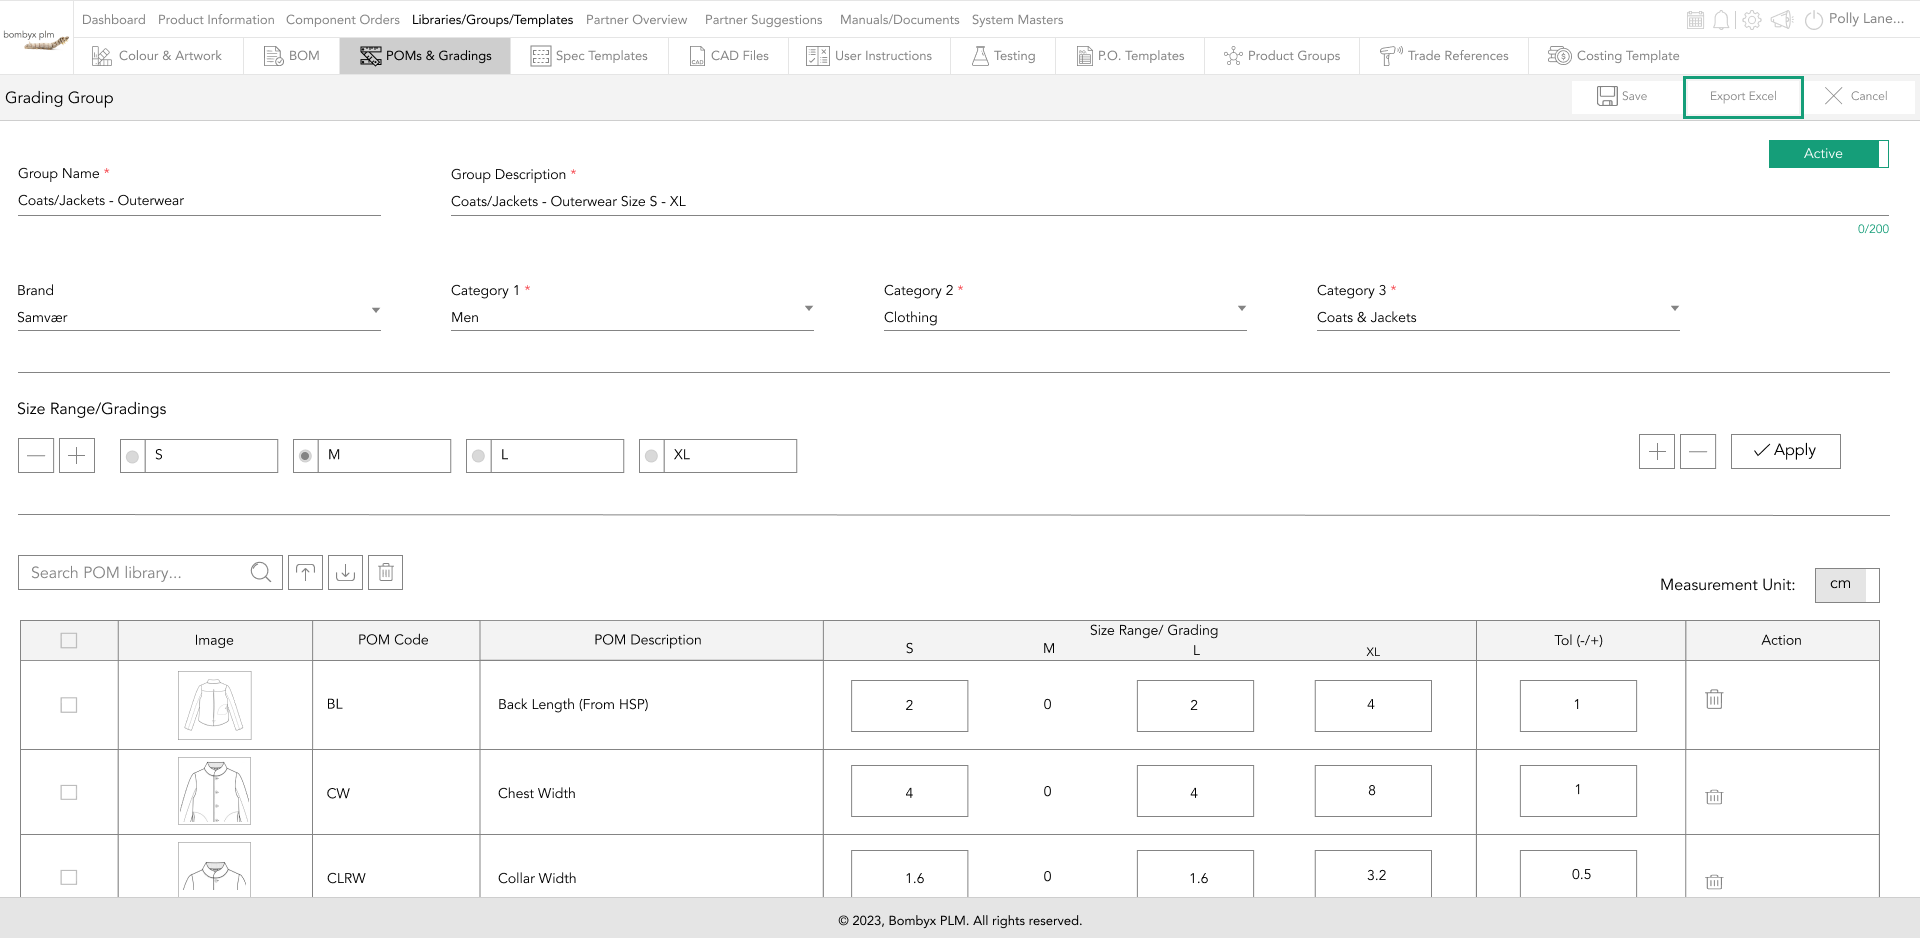
If grading is hidden the excel sheet will not show any grading in the document, and if the grading is visible on the screen when you download the excel sheet, the grades will also be applied to the excel document.
upload measurements from an excel document in (other) specifications
If you’ve previously been developing your products via an excel document, you can quickly upload that data into (other) specifications of the product by tapping the upload icon button next to the search bar function.

Note: Your grading group and POMs must already be added to the POM library and a grading group formed in the LGT, and assigned to your product in order for the system to upload the data from your excel document.
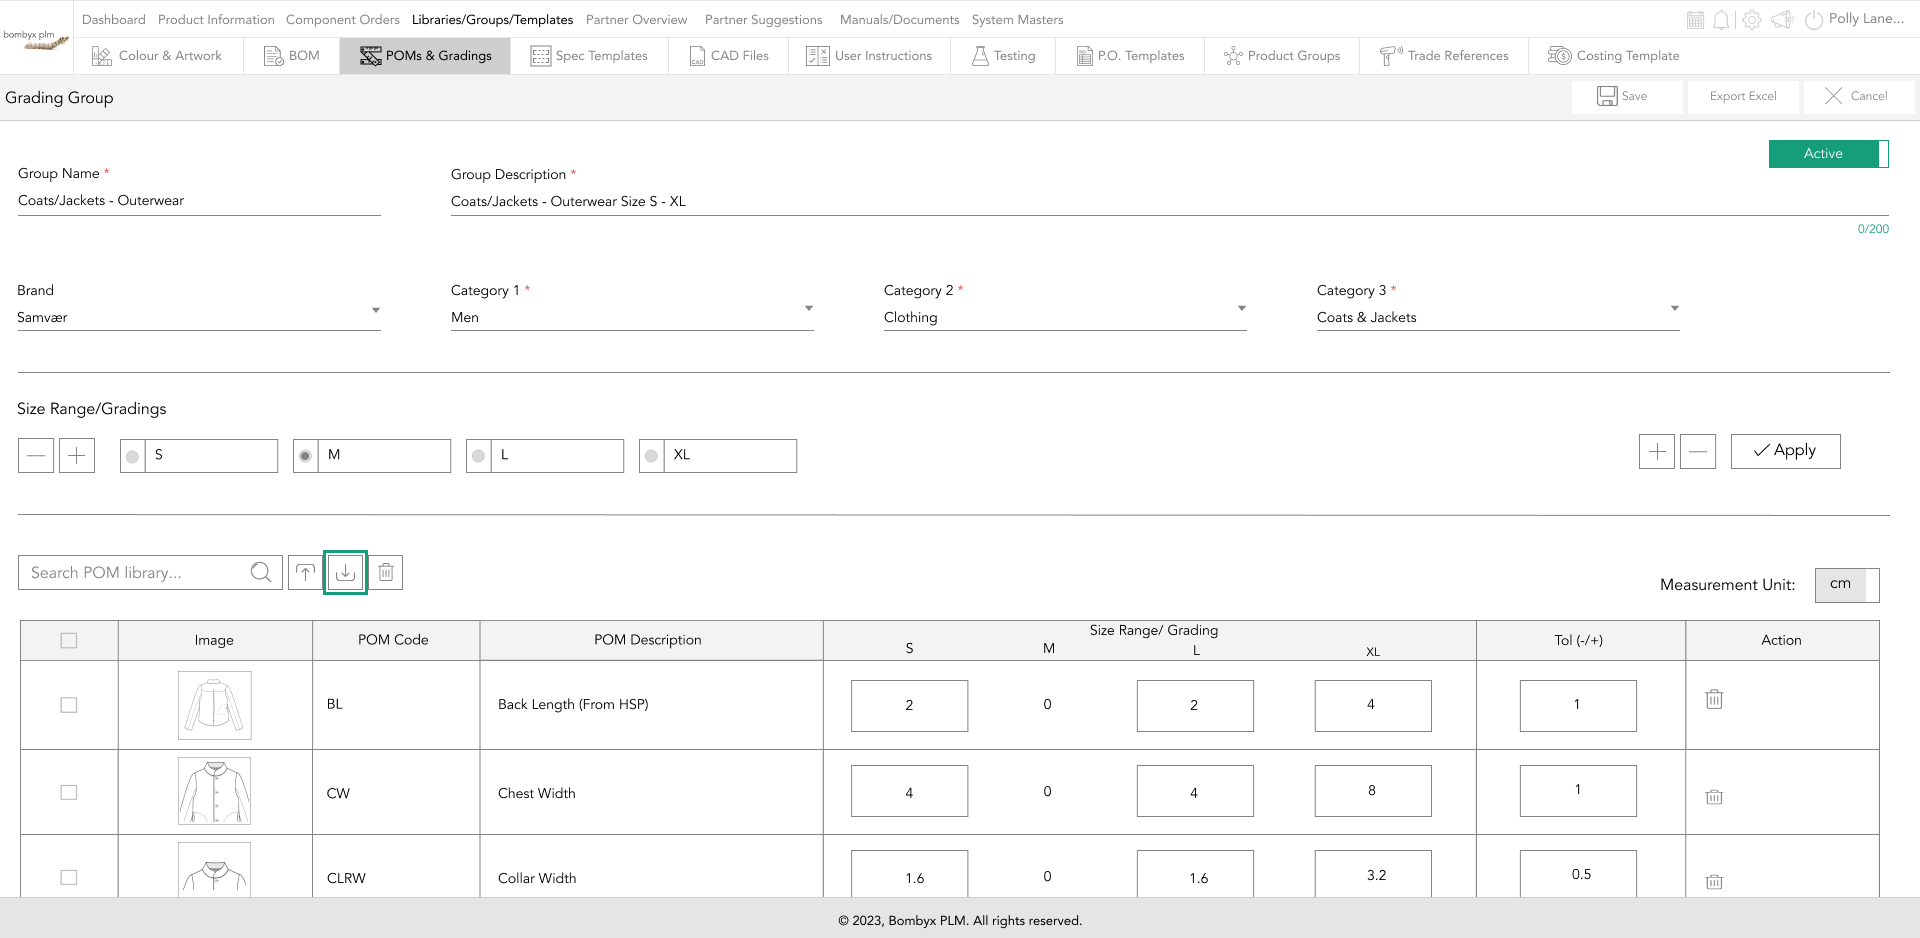
downloading sample files
When you have completed entering the information of the grading group, you can now download the grading group as an excel document.
To download a sample file of your grades, tap the download icon that is located next to the search bar function.
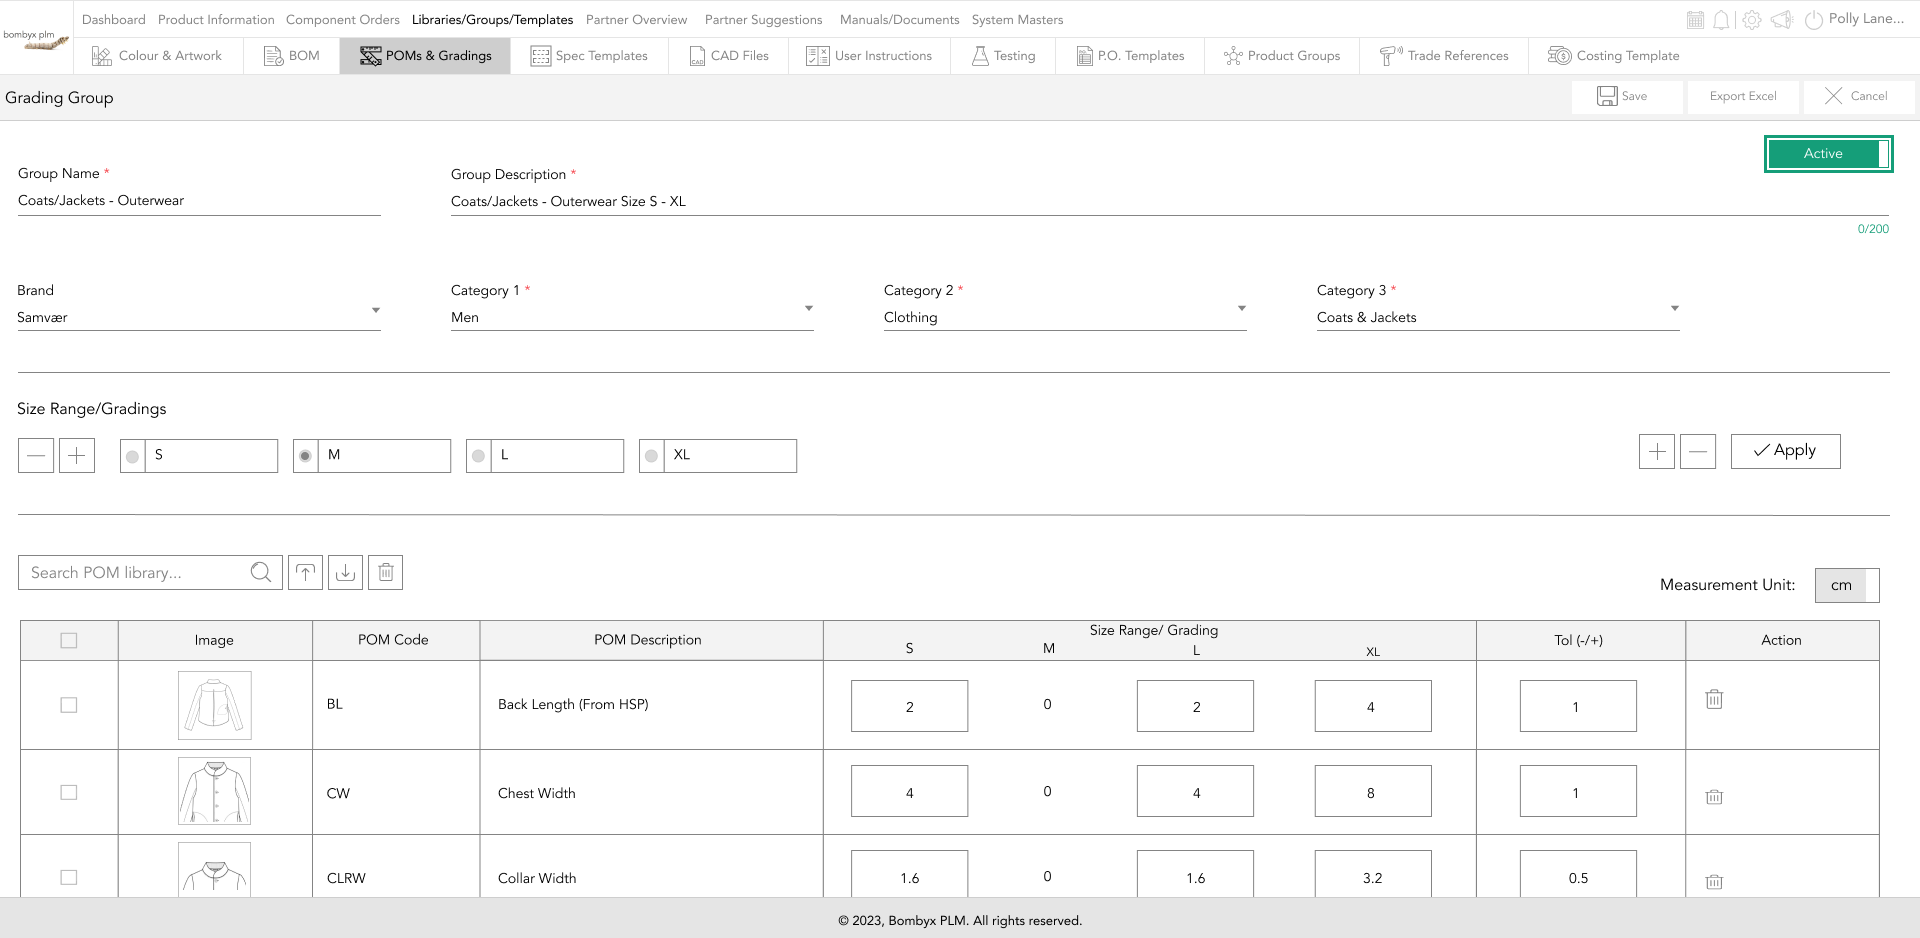
active/inactive
In the grading group, you will see a box that says inactive and if clicked it will turn to active.
When you have finished entering the relevant information, and you want to link the grading group to the product, you need to make sure this group is active.
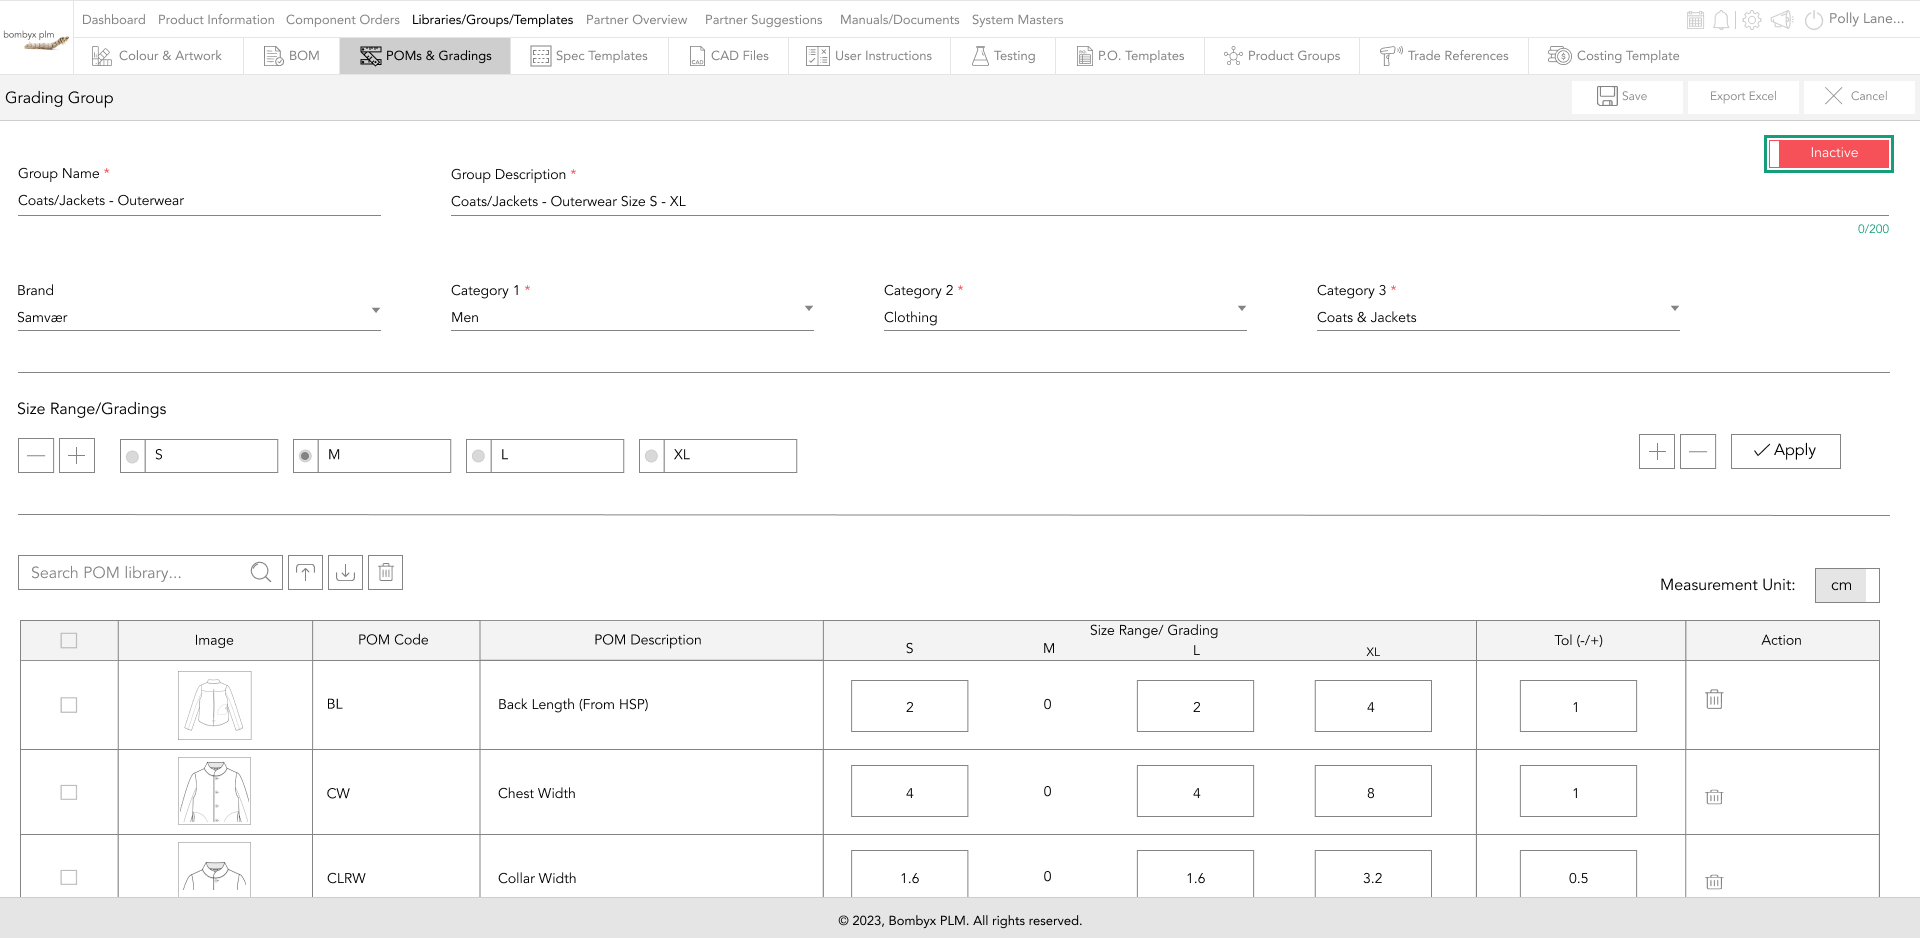
If the grading group is inactive, you will be unable to add groups to products.

Beyond the Label: Diving into the Sustainable Story with Digital Product Passports
Consumers today are increasingly concerned about the environmental and social impact of their purchases. From the food they eat.

Bombyx’s AI Integration: Advancing Business Excellence in PLM, PIM, and DAM Systems
Let's delve into the exciting realm of Artificial Intelligence (AI) undergoing a transformative evolution. As we Enter the year 2024.

Beyond Baubles: A Stylish Dive into Christmas Fashion Trends.
e explore the latest Christmas fashion trends, with a focus on achieving a harmonious balance between sophistication and comfort. From luxurious velvets to cosy knits

Streamlining Winter Fashion with PLM: Managing Seasonal Changes
Winter fashion production demands meticulous planning and execution. PLM serves as a guiding force in production management, aiding in resource allocation, scheduling

Christmas Experience through Digital Transformation
During the Autumn/Winter months in Europe and the USA, are marked by heightened activity. The festive season introduces an atmosphere of joy and unity. Amidst the era of digital in

Demanding Trends & The Transformative Power of Product Lifecycle Management
Explore how strategic Product Lifecycle Management (PLM) empowers fashion to navigate trends sustainably. This post delves into the symbiosis of trends and sustainability,

The Power of Product Information Management (PIM) With a PLM System.
In today's fast-paced business environment, effective product information management is crucial for success. Product Information Management (PIM) is a powerful tool.

Fashion and the Power of Product Lifecycle Management
In recent years, the fashion industry has witnessed a surge in fashion, a phenomenon characterised by the rapid production and consumption of inexpensive clothing... and a whole l

Supply Chain Management has Forever Changed
Brands make use of product lifecycle data analysis to help them work out price points, marketing and advertising strategies, packaging, growth and expansion… and a whole lot more